Eye Makeup Step by Step
Step One: The Loose Powder
Start by applying some loose powder all over the lid to allow proper operation of your makeup.Tips: Remember to put some makeup on the eyelid to neutralize the color of it.
Step Two : The Eye Pencil
I recommend starting with the eye pencil before eye shadow since it has the texture "creamy" while makeup is dry. The application will be easier and will set the makeup pencil (good makeup).- Trace the outline of the eye at the edge of the lashes. It just emphasizes the inner edge of the lashes.
- We start from the outer corner: 2/3 then melt on the upper eyelid, and 1/2 then melt at the lower eyelid.
- Blend a little pencil (especially under the lower eyelid to be less makeup).
- You can use a cotton swab to smudge.
Tips:
For perfect makeup use a pencil neatly trimmed.
If you are tired do not wear makeup your lower eyelid: This accentuates the dark circles.
To effect a "cat eye": Replace the path of the pencil to the outside of the eye.
For small eyes: Apply the pencil to the outside of the eyelid and possibly apply a white pencil inside the eye.
For eyes: Apply the pencil inside the eye (choose a dark shade).
Tricks:
To effect a "cat eye": Replace the path of the pencil to the outside of the eye.
For small eyes: Apply the pencil to the outside of the eyelid and possibly apply a white pencil inside the eye.
For eyes: Apply the pencil inside the eye (choose a dark shade).
Step Tree : The Eyeshadows
To choose your colors refer to the chapter on "The choice of colors."- Choose a shade lighter than you put on the whole eyelid.
- The dark shadow will be applied in the hollow of the arch with the point of the applicator.
- Blend the color by stretching outwards.
- You can mark the third eye using a darker shade along the lash, and a white shadow just under the brow bone.
- You have too great an eyelid? Use a dark eye.
- You have too small an eyelid? Apply a light shade over entire lid, then a dark shade on the outer corner of the eye to widen the eyelid.
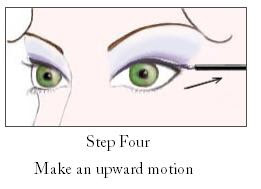
Step Four : The Eyeliner
To draw a sharp line:Apply the dotted and unify the stroke from the inside to the outside.
For easy application:
- One hand, hold a mirror horizontally against your chest.
- Bow your head, touch your chin, look at the mirror, the eyes are immobile.
- On the other hand do the eyeliner to the lash by relying on the lash line with a fluid motion.
Step Five : The Maskara
- To intensify the eyes: The mascara gives volume, lengthens and plumps lashes.
- We start with the upper lashes (very close to the root), hold the brush horizontally, make a zigzag motion, looking down (eg a mirror).
- Although the outside work to enlarge the eye makeup and very slightly the lower lashes.
- To effect a "cat eye": Replace the path of the pencil to the outside of the eye.
- For small eyes: Apply the pencil to the outside of the eyelid and possibly apply a white pencil inside the eye.
- For eyes: Apply the pencil inside the eye (choose a dark shade).
For more intensity: Apply mascara color and immediately after a black mascara. Glamour effect guaranteed!
For a neat result: Remember to clean the brush in your mascara tube and close well after use.
For an evening: You can opt for false lashes! They come in all colors!
Step Six : The Eyebrow Pencil
- Choose a shade close to the color of your eyebrows.
- Brush them from bottom to top.
- Redraw the hachurant in all of the curve and following the natural course of the bristles.
- There are also "shadow eyebrows" that you apply with an angled brush.
Tips:
- If your eyebrows are too thick, then progress them in the proportions of the 'triangle alignment "(see:" Correction ").
- Never remove hair on top. It only removes the hairs that fall under the arcade
Source : Eye Makeup Styles


